Friday, November 22, 2013

Coconut Oil Hair Treatment


 Heyo. College and life in general is busy and I'm trying not to slip on skin and hair care. Keeping my hair healthy has been really important to me, as it makes me feel confident and better about myself. It's also important because I'm growing my hair out and at the first split-end appearance I run to get my hair trimmed. 

As a hair treatment to keep my hair soft and strong, I've been using coconut oil. Coconut oil has been all over the internet for anything and everything, but I thought I'd share my technique and a few tips I've learned in order to maximize the benefits of doing such a treatment. 


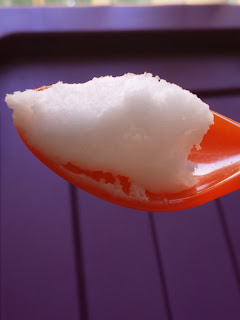
Coconut oil is a solid at room temperature and warms to body temperature. In my area I've found that Trader Joe's has the least expensive large jar, even compared to online. (You might get lucky at Whole Foods or other health food stores) I believe this 16 oz jar was about 6 dollars. 
I would recommend NOT sticking your fingers directly into the far to scoop it out. It can mold. Just use a spoon. Even I use a spoon and I live in a dorm. 
 I begin working the oil through my hair gently as it melts. 
I use enough to pretty much saturate my whole head. Sometimes I rub oil directly into my scalp for a little massage, other times I focus on the length


If you choose to comb through your greasy, somewhat tropical-smelling hair, remember afterwards to wash the brush before using it on clean hair. Don't forget. Don't make my mistakes. 


After twisting into a bun I put on my shower cap (cute yes I know) to utilize the heat of my scalp. This isn't essential but helpful. I keep this on my as long as I can, usually at a minimum of 20 minutes. Sometimes I blast it with a warm blow drier, but not always. 

Washing hair after an oil treatment is substantially different than washing it normally for me. Typically, I use as little shampoo as possible, rubbing just on my scalp to avoid unnecessary damage and fading to the length of the hair. Of course this method isn't suitable for oil-globbed hair.

 When I get in the shower, I spend some time finger-combing while rinsing with warm, running water. Instead of shampooing my ends directly, I take almost a palmful of my cheaper conditioner (pretty much any kind will do) and begin working it through my hair. It's best to take time to really rub it in, concentrating on the length and ends. The conditioner is usually enough to get oil out without lathering shampoo all up in yo ends. 

Only after rinsing thoroughly do I pick up my shampoo and wash my scalp as I usually do. I let more lather run through my ends than usual. Then I condition as usual, tie my hair in a loose bun, and rinse it all out at the end of my shower. 


NOW I usually do this treatment when my hair color has faded a significant amount and my roots are starting to show. It doesn't strip color necessarily, but I'm more comfortable doing this a little closer to when I have to recolor. 

I think it's silly to make statements like "makes hair grows faster" or "mends splits ends," as many an article have claimed. In my experience, this treatment is worth it in that my hair feels softer and stronger afterwards. 

Aaand that's that! If there are questions or comments, I'd love to hear them! Thanks and have a great day, I'm off to type an overdue paper!

Friday, July 12, 2013

Baby's First Sewing Project


Spoiler: I made a skirt.


HELLO so I got a bunch of random fabric at a garage sale from a woman who used to be a quilter. Everything was a quarter each and since I came near the end of the the day, she said I could pick out a few for free. Weeee thanks lady.

One of my favorites in the bunch is this slightly stretchy floral print. I intended to make a circle skirt out of it, but there simply was not enough to make a decent-length circle skirt. (BUT I have the pattern traced out for when I do find something I'm in love with that works. I used pi and everything. Math.)


My friend Sarah showed me a link to this skirt, which Lindsay from Shrimp Salad Circus explained ever-so-well. I liked the look of hers, and how easy it appeared to be, so I thought I'd give it a go. Keep in mind I'm really new at this. I kind of just used her instructions as a baseline. Probably my biggest deviation was that I made one seam instead of two.

 I didn't have great elastic for the task either, I used fold-over elastic leftover from ponytail holders I made. It does the job, and would be good for baby skirts I think, because it stretches a lot and the pull is gentle. Notice I'm using my mattress as a pincushion. B E G I N N E R.
THE SOLE PURPOSE OF THIS PICTURE IS TO SHOW OFF THE CUTE CHEVRON FABRIC I GOT ON SALE AT HOBBY LOBBY.


I pinned everything up and stitched up the top, leaving a little hole to pull the elastic through.


Using a safety pin to pull the elastic through was much easier than expected. I tried on the skirt to ensure the fit was okay, and I determined where to stitch the elastic together. I like high-waisted skirts. Notice the completely un-matching shirt.

 I hemmed up the bottom and that was that!


Lalala awkward modeling. I could wear this with my black wide belt. Probably my favorite thing about this print is that it has black in it, so I could wear black tights or a black cardigan and don it in winter.


It's not perfect, but I like that this method is super easy and any length could be made. I'll probably do another soon. Thx 4 reading bye :-)

Friday, June 7, 2013

Hey! It's been awhile! I've started my job up at the preschool for the summer, which is crazy but I do love the kids. Plus I need $$$ for a 3DS. Anyway.

On my tumblr I posted pictures of my hair growth in 6 months: 


Pretty scraggly in the second picture, I know. I never got a trim during this period, which is terrible for me, I love haircuts and it's important for me to keep up with split ends, I know. With living at school, even though I came home a lot, college made it more difficult to get to a salon. (excuses, excuses.) But in terms of hair damage, I didn't need a trim until the last month or so. That was due to pure laziness. 


This is my hair after a trim, she took almost an inch off. (I'm actually sitting up straight in this picture)

After posting these pictures, I got a couple asks about my hair routine. I went a little crazy and wrote more than I thought I did, so I'm just going to go ahead and adapt it for here. 


What I Do To Keep My Hair Relatively Healthy:


 One overall tip, and what I find to be the most important, is to always be conscious of what you are doing to your hair. Like, no amount of hair product is going to cover up constant damage from rough drying with towels, or wind, or over-shampooing, or ripping through wet (or dry) tangles with a brush, etc. 

That being said, this is what I do personally. I really try not to shampoo all that much, and when I do, I'm so careful to use as little as I can ONLY on the roots. A quick squeeze with leftover suds as you rinse through the ends is typically enough to clean the length of the hair. (keep in mind, I have fine, straight hair prone to oil. Seriously, don't rub shampoo all up on yo ends unless you have major product buildup) 

Of course I limit the use of heat tools, blah blah. That's half because of laziness but hey whatever. I like sleeping in foam rollers. blah blah heat protection we've heard it all before blah blah. It all comes back to being aware of what you are doing to your hair.


 If you haven't already TRY DRY SHAMPOO. The only brands i really recommend are "Pssst" (personal favorite) or Batiste (although I don't like the scented one, very stong and old-ladyish.) I like the Suave one as well, but that adds more texture to hair, I guess it just depends what I'm going for. Walgreens also has a generic dry shampoo which i'm trying out, it's awesome so far. Stay far away from the Tresseme one, or anything that comes out of the can wet. You literally just need powder in a can.

I tend to change up shampoos a lot, but i'll name some of my favorites. I like shampoos that are meant for moisture but also lather and therefore clean well. I've really liked the Lush Jumping Juniper solid bar (it's good for oily hair), the Organix Hydrating Macadamia Oil shampoo (very creamy but lathers up well), Head and Shoulders in Ocean Lift (purple bottle, for when my scalp gets a lil' itchy in winter, plus I love the scent), and i'm currently using Aveda Color Conserve. It's okay so far but it's pretty expensive so I probably won't buy it again. My ALL TIME favorite shampoo is definitely the Suave Professionals Almond and Shea Butter. It's so cheap (like $2)  and really works well for moisturizing without being too heavy. As for conditioners, my favorites have been the Suave Professionals Almond and Shea butter (they work great with different products or together) and the Aussie 3-Minute Miracle deep conditioner. I wash my hair first thing in the shower and let my conditioner sit in a side bun until i'm ready to get out. (more recently, with my red-colored hair, I've been only washing in tepid water or cooler. I can't even begin to tell you how much this helps with fading.)

 I've experimented with olive oil and coconut oil treatments. They have been pretty nice.  I literally just warm the oil and massage into dry hair and scalp. I keep it in for as long as I can and then wash it out. Instead of going straight in with lots of shampoo to get out the excess oil, I rub in any old conditioner on the ends for a bit, rinse, then shampoo as normal. I've found that this greatly lessens the amount of drying shampoo I need to use on my ends.

A few leave-in conditioners I've liked are the "Light Moroccan Argan Oil" and "Coconut Milk Anti-breakage Serum" from Organix (in very small amounts), and the Got2b "Smooth Operator Lustre Lotion." I think it's important to just put something in your hair before it dries.

I've never really fallen in love with a volumizing product or texturizer or hairspray or mousse. Life is hard with flat hair.

And uh that's pretty much it, I'd love to know if anyone has tried these products; I'd also love to to hear what you like/your routine! 

(if u have google+ u can comment pls help me 2 feel cool)


Wednesday, May 22, 2013

Quick RantReview About an Unacceptable Foundation

Okay so I am very passionate about something so I thought I would share. Before I took a shower tonight I tried out this one foundation which I've had for a little while. It's the Rimmel Clean Finish foundation.

Looks safe right? 
[it's not]


 Now don't get me wrong, the finish is actually pretty "clean" as in not super-heavy and it doesn't accentuate pores. It is almost a gel rather than a cream, and the finish is very matte. There also a few other claims on the back like vitamins A and E, plus antioxidants, fragrance free, dermatologist-tested, all that jazz. I got it on sale and it was pretty cheap to start with, so what is there to complain about?

THIS. 


 okay this this fine
 smooth it in a lil
 huh this is weird
 WAT


This stuff oxidizes like crazy, aka it changes colors and turns way orange on my skin. This is not okay, and even more noticeable on a face than on an arm. I am quite fair (pale) and the lightest shade starts out dandy, but a mere 10 second later it's like I'm one of the popular girls from my graduating class in high school (orange). ahem anyway.

I know this came out at least a year ago, but as I saw it on the shelves the other day in CVS I thought maybe I could save someone a couple of dollars and a lot of heartbreak. Especially since CVS is having their big makeup clearance right now; don't be disillusioned. It's not worth 50% off. I promise.

Tuesday, May 21, 2013

Updating Plastic Storage (Doing Things #1)

Hello! So I did a thing the other day. Taking pictures for this definitely kept me on track. Plus it was much-needed, as I desperately need a place other than a big travel bag for my makeup. (This will also be great to take to college fall semester!)  I got this white (kind of dirty) set of storage drawers from my uncle, who brought it to sell at our family's garage sale. Instead of spending  15+ dollars on one, I decided I could make this one work for me.

Updating Plastic Storage 


What I used: 
  • A set of plastic drawers, brand unknown. Sterilite makes similar ones, but I've seen these kind of things at garage sales, thrift stores, and clearance sections especially after "back-to-school" season. 
  • A tarp or newspaper, and a way to hold it down at the corners. (You may not think there's much wind but you'll be sorely mistaken.)
  • Painters tape
  • Paper towels (way more handy than I thought)
  • Spray paint 

MAKE SURE the spray paint specifically say it works on plastic. It's less than four dollars at Home Depot. I chose purple, of course, my favorite color. Also, it's REALLY important to do this in a well-ventilated area, and to be mindful of the general direction of the wind.


First, I washed the drawers with dish soap and the hose and set them to dry in the sun. This is important.


I took out the drawers (and set them way aside) and began the easiest part, which was painting the outside shell. In long, neither slow nor fast, consistent strokes, I swept in 8-inch swishes until a thin coat was upon the box. This what it looked like after.

After about a minute, I did a second coat in the same fashion so there were no white spots. I found this method important because putting on a too-thick layer leads to unattractive drips, which had to be wiped quickly and gone over again later. I found doing each side separately was the easiest way to control this, though it requires more patience.

OKAY now for the drawers, I didn't want any paint on the clear part, and as the nature of spray paint is to GET EVERYWHERE I made sure with painter's tape and paper towels that there wasn't going to be purple anywhere other than the handles. Although i'm sure the clear plastic would have taken the paint okay, it wasn't the look I was going for. Take your time to make sure the tape lines are p e r f e c t.


I carefully peeled the tape off before it dried too much to avoid the paint peeling, then I let everything dry for a couple hours before handling, just to be safe.


Okay this is very important! Make sure everything is 100% dry. I made this mistake and i had to quickly wipe off and repaint. It comes off with nail polish remover, so it's not a huge deal, but it is an inconvenience.  Check out those water bubbles. 

(I also painted a bit of the inside lightly just because the drawers were clear and i was like yolo)


AND YOU'RE DONE
See how fun and pretty it looks now? It no longer looks boring and "temporary" as plastic furniture can. 


All of my makeup fits in the drawers very well, just as the drawers fit very well on my desk! I divided up the inside with smaller boxes i had previously used to store makeup. Drawer dividers for pencils or silverware could be used for this purpose. And hey, those could be painted too! ;)


Very easy if you take your time! I'm proud of myself honestly of the patience I had for this. You could ask a question or comment on my process if you want!  Tschüss!


Monday, May 20, 2013

Hello there!

Hi! I'm new at this so bear with me. I'm Clara and I'm from Michigan. I attend a university and I'm currently studying to be a speech-language pathologist, hopefully with children. I live on-campus during the school year and I work at a preschool.  I prefer staying home rather than going out, cool weather to hot weather, and musical theatre to sports.

 Although I frequently use a multitude of social networks, I decided a blog might help me get projects and thoughts in order. I'm learning currently learning how to utilize my new sewing machine, to hopefully one day correctly alter clothes to fit my under 5-foot frame, and also to make cute, useful, non-cheesy things. (okay maybe some cheesy things)

I think I got some of my "DIY" attitude from my mother, who is a gardener and creates miniature gardens and other garden accessories. I also inherited the attitude that a little bit of a mess is okay, but I'm trying to control that as well. I am the oldest of three, with two boy scout brothers.

My blog title is a play on my full name, Clara Albright. The synonyms also kind of represent the purpose to thing blog for me, which is to lay out goals so that I can accomplish what I both need and want to do.  Thanks for joining me!